If you open a Scenario with activated and configured Studio Recording Mode, you will only see a single source per output video feed in the Preview Screen (after confirming the Basic Recording Information dialog) - independent of the number of Sources available in your current Scenario.
▪Click on the Arrow in front of Studio View in the side panels, to see a list of the available video feeds and a preview of the sources assigned per video feed:
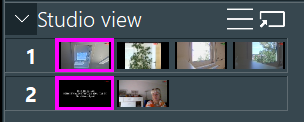
The first source per video feed is automatically selected and displayed on the Preview Screen per default.
▪Click on another small preview to activate the recording that camera within the active video feed.
The currently selected and therefore recorded camera is highlighted with a pink frame.
▪Undock the Studio View panel and re-size the now floating panel to enlarge the previews of the independent camera feeds.
IMPORTANT: Only the currently highlighted camera is recorded.
Start Record
Starting and ending the recording is identical to regular 'per camera' configurations
▪In the Studio View panel, select the initial cameras to ensure the Preview Screen show the correct situation.
▪Click Start Record ![]() to start the actual recording.
to start the actual recording.
▪Whenever needed, change the content of the current video feed by switching between the cameras displayed in the Studio View panel.
Note: Switching between cameras within the Studio View panel changes the content of the corresponding output video feed.
▪At the end of your session, click Stop record ![]() and confirm the additional dialog.
and confirm the additional dialog.
▪Wait for the data to be saved properly.