VideoSyncPro Studio consists of multiple 'panels' that can be undocked into separate, free floating windows that can be positioned across monitors.
This means that each camera preview or re-play source can be shown in a separate window, but also that all sources can be undocked at once.
Same is possible for the available side panels with their various functions and source states.
| TIP: | Custom configurations can be stored in a Windows Layout, ensuring that all panel positions, active sources, etc. are restored for the next session. |
Source Panels
Inside the VideoSyncPro Studio application window, all video sources are lay-outed in a default way, depending on the order the sources were assigned to the scenario.
IMPORTANT: Once you have re-arranged all windows to you ideal position, make sure you save your preferred layout as a Window Layout template.
Video Layout
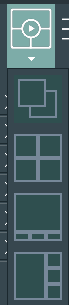
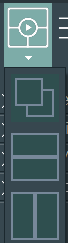
Depending on the number of cameras in the current scenario, you can choose between one or more layouts for your videos arrangement.
▪Click on the ![]() Video-Layout button in the toolbar to see the possible arrangements.
Video-Layout button in the toolbar to see the possible arrangements.
Depending on the number of cameras, a number of possible layouts are listed like this:
For 4 videos
|
For 3 Videos
|
For 2 videos |
Für 8 Videos
|

Focus Video
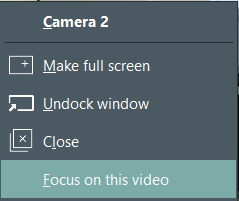
You can change the order of the videos by changing the focus video:
▪Right-click into the video you want to make your focus video. ▪Select Focus on this video from the context menu. This feature is especially useful if you selected a layout that shows one video larger than the others. Per default, the video source in the scenario is automatically enlarged. |
Maximize a Single Video Image
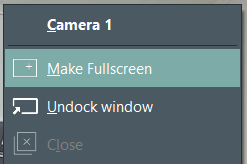
To maximize the view of a single video image full-screen:
▪Right-click into to video and select Make Fullscreen from the context menu: |
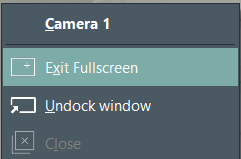
▪To exit full screen, make again a right-click on the video and select Exit Fullscreen: |
Re-arrange Video Windows
It is possible to spread the available video windows over multiple locally connected monitors by undocking them from their predefined location.
This can be useful if you are presenting all or part of the camera views using an overhead projector. That way you can use the projector as an external monitor to show the videos and at the same time keep the controls and markers on your local screen, invisible for the viewers, but available to you for full video control.
Note: It is also possible to transmit video images to another room over the network, as is described in Viewing Room Functionality.
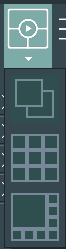
Undock ALL Videos
To undock all video windows at once, so you can transfer all camera views to another monitor in a single step:
▪Select the first icon from the ![]() Video-Layout menu.
Video-Layout menu.

▪Drag the now separated preview panel to the required monitor:

▪Close this separate preview panel to place it into the VideoSyncPro Studio application window again.
Undock a Single Video
To spread different camera views over multiple, locally connected displays, you need move the windows outside the VideoSyncPro Studio application window.
▪Right-click into the video window and select Undock window to undock it from the predefined layout:

▪Drag the now floating video window to the required position and re-size it the way you need it:

▪Close the separate window to place it back into the VideoSyncPro Studio application window.
Note: How to transfer video streams over the network is described in the chapter Viewing Room Functionality.
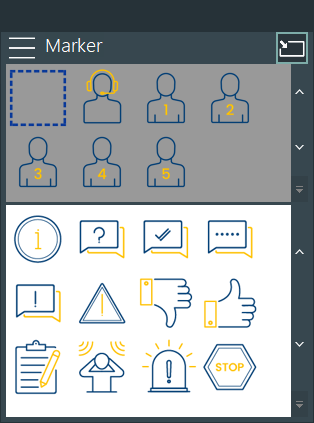
Dashboard Panels
Whenever you are in an active session, several side panels at the right of your VideoSyncPro Studio window offer direct access to the available components and functionalities.
The number and type of available panels depend on the active options and functions for the current Scenario.
Each of the side panels can be 'undocked' separately, or you can undock all panels as a whole.
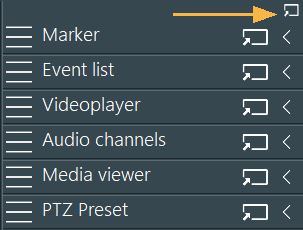
Undock all Dashboard Panels
If you want to position all side-panels at once in another location:
▪Click on the little Undock icon in the upper right corner of the side-panel bar: |
|
This results in a free floating window that holds all available panels.
▪Close the floating panel window to re-insert all panel in the side-bar again. |
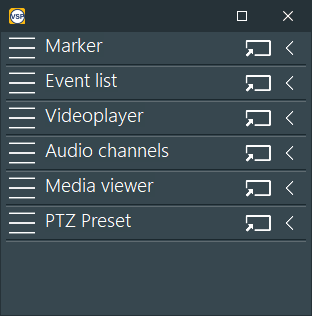
Undock a Single Side-Panel
To move a much used panel to a more convenient position, you can undock just that one panel:
▪Click on the undock icon at the right of the panel name.
This results in a free floating window that holds all controls of the chosen panel:
▪To return the panel to the original side panel position, click the Dock icon the in the top right corner. |