If your lab contains PTZ-Cameras, we recommend to store often used camera positions in predefined Preset postions.
Preset-based Camera Control
If you need to switch between specific camera positions regularly, we recommend to save those positions in so-called presets. The biggest advantages of Presets are:
oInstantly return to a specific position and zoom level
oMove multiple Cameras with a single command
oPosition cameras from within the Remote Observer
Save Preset for all Cameras at once
The fastest way to defines the required presets is this:
▪Position all cameras to a desired position (angle, zoom factor, etc.).
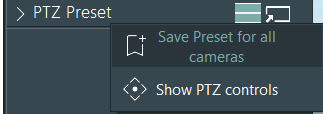
▪Click on the PTZ Preset Menu ![]() icon in the PTZ Preset side panel.
icon in the PTZ Preset side panel.
▪Select Save Preset for all cameras from that menu:
A dialog to name the current position of your cameras appears:

▪Enter an easy to recognize name for the current Preset-position.
This Preset is now entered for each camera individually and that entry is automatically listed in the PTZ Preset side panel.
Note: Calling a Preset-position will automatically re-position all cameras that have a Preset with that name in their list of Presets.
▪Click the Save button to store all currently listed Presets into the current Scenario file
Only lab managers and administrators can predefine presets that are also saved in the scenario.
Standard users can only create presets for the current recording session.
Save Preset for a Single Camera
To save a specific camera position for a singe camera only: ▪Position that camera in the desired position (angle, zoom factor, etc.). ▪Right-click on the camera preview to gain access to this context menu. ▪Select Save Preset. ▪Enter a name that fits the current position in the upcoming dialog: |
")

▪Confirm with OK to save.
▪This Preset-name is now available in the PTZ Preset side panel.
▪Save the current Scenario to reuse those stored positions.
| TIP: | If your video lab is used for completely different setups, you can save multiple Scenarios with the exact same cameras, but holding different sets of Presets. |
Edit PTZ-Presets
Overwrite an existing Preset position
▪Position all cameras to their adjusted positions.
▪Select the Save Preset for all cameras command as described before.
▪Reuse the exact previous preset name to overwrite the previous settings.
Rename Preset
▪To rename an existing Preset, click the Edit pencil at the right.
▪Enter the new name into the upcoming dialog and confirm the correction with OK.
▪Save the scenario to ensure that the changes are available for the next recording.
Delete Preset
▪To delete an existing preset, click the Edit pencil at the right.
▪Click on Delete in the bottom left corner of the upcoming dialog.
▪Save the scenario to ensure that the changes are available for the next recording
Change Default PTZ Speed
There is a hidden option that allows you to alter the default speed used for the PAN/TILT/ZOOM movements of Axis PTZ cameras. This adjustment must be specified manually, within the scenario file used for recording. The change must inserted for each camera source within that scenario:
▪Close VideoSyncPro Studio.
▪Navigate to the folder C:\Users\Public\Documents\Mangold VideoSyncPro Studio Data\Scenario
▪Open the scenario you want to edit in your favorite text editor.
▪Scroll down the file until you identify your first source, starting around line 25.
▪Add the variables SpeedPanTilt and SpeedZoom and the required new values in %.
These % values are calculated from the maximum speed.
Incorrect values are automatically fitted into the interval [10%..100%]:

oSpeedPanTilt=50
oSpeedZoom=75
▪Save the changes and test the effect of your changes in VideoSyncPro Studio.