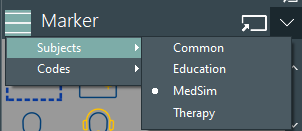
When you start VideoSyncPro Studio, the currently selected Coding System and Subjects are available in the Marker panel at the top of the side-panel section on the right. ▪To select another set of Subjects or Marker, click on the Marker menu and select the required set from the sub-menus: To assign specific Subjects and Markers to a Scenario: ▪Select the required sets and save the Scenario. |
Per default, the first set in both Subjects and Markers are selected automatically.
Note: The Marker menu offers as many coding systems as are folder available within the Subjects and Markers folders inside the Mangold VideoSyncPro Studio Data folder.
Remove setups you do not need for your studies from those folders.
For details read Icon-Markers.
Log Subjects and Marker
IMPORTANT: Each marker can be logged for a specific subject.
▪Select the subject you are currently observing, by clicking the corresponding icon in the Subjects section.![]()
The selected subject becomes 'active', indicated by the highlighted background color:
▪Click the required Marker icon, to enter a specific Marker for this subject into your log file
Each new entry is now recorded for the currently activated person:
Each click on a Marker results in a new line, showing a time-stamp for the moment you clicked in the Onset column. This information is stored in the *.MVSRecMarker log file.
In addition to the time information, the icons for the selected Subject and Marker are displayed in the Event list.
Per default, each Marker ist logged as a 3 second interval. You can specify the default duration of your Markers in the program settings.
Note: A selected Subject stays active until you select another Subject or the None icon.
Subject Independent Markers
To log Markers that are not related to a specific subject:
▪Select the ![]() No Subject icon before you log the next Marker.
No Subject icon before you log the next Marker.
e.g., to log Events such as the arrival of the ambulance or general interruptions.
Markers only
To remove the Subjects from the Marker side panel, clear the Subjects icon visible option within the Scenario properties.
Note: Removing any none-required systems from the Marker and Subjects folders inside the Mangold VideoSyncPro Studio Data folder limits the possibilities to relevant options only.
Only the icons available in the currently selected Marker folder appear in the Markers section, like this:
▪To enter a specific term in your log file, click the corresponding marker icon.
In the log file, each click results in a new entry with a Marker icon, timestamp and the term that was clicked:


